HEY GUYS, today I will be talking about one of the hardest topics in the entire Computer Science syllabus for both SL and HL. A lot of people get stuck when they see this topic in Paper 1 since the type of questions that appear on the test require a lot of deep understanding of what each feature mean in any algorithm. Let me make it clear, I won’t go through EVERY SINGLE DETAIL in the book, because you can do that yourself. BUT, do not worry, I will go through the important parts of this topic step by step that you can understand it 😉
Table of Contents
What is an algorithm?
To put in simple terms, an algorithm is a set of instructions that will output a process or value with a finite number of steps. Okay, that’s a little bit complicated so let’s put it in real-life terms. How can we drink a glass of water?
- Go to the fridge and open it.
- Grab a bottle of water.
- Pour that water into a glass.
- Drink from it!
In this scenario we have a problem and we can solve it by following a few steps, meaning that this example IS indeed an algorithm! From this simple algorithm, can we dissect some of the important traits that make one? Of course we can.
- An algorithm should have a limited number of steps. It cannot go on forever and ever or the computer would start frying up.
- Each action needs to be clearly stated. This is so the computer understands exactly what to do (just like how humans need to know how to get the water and drink it).
- There needs to be input. With reference to our scenario, we need to know how many glasses of water to take, from where to take it, etc.
- Then there’s the output. With any input, there will always be output to show that we have done something with the input. For example, we drink one glass of water.
- The algorithm needs to be effective. This means that the steps should be simple enough to execute with all the limited resources. We should be able to drink the water without having to travel to Fiji on a private jet, using resources we don’t have access to.
The rest of the topic talks about expressing important algorithms in code, pseudocode, and flowcharts, understanding what these algorithms will output, and understanding important computer science terms related to these algorithms. Before we head into the more complex stuff, let’s go over some key terms you need to remember.
SUBROUTINES
Subroutines are like pieces of a puzzle. It’s main purpose is to split up complicated tasks or large programs into smaller, more manageable code. There are two types of subroutines:
- Functions. These return a value.
- Procedures. These execute steps.
VARIABLES/CONSTANTS
Variables are storage units of data. Imagine the variable ‘number’. Then, lets say it can store an integer(a whole number). Then we set the ‘number’ as 1. So, the next time we RETRIEVE or OUTPUT the variable, we will see the number 1. A constant is similar to a variable since we can access it, however, we will be unable to change the value of a constant because it is fixed.
ARRAYS
Unlike variables which can only store one unit of data, arrays can store MULTIPLE units of data. We will see how this is applied later on in the examples.
IDENTIFIERS
Each subroutine, variable, and array needs a name so that it can be used in other parts of the code. That name is known as an identifier.
LOOPS
Repetition of instructions. Simple as that. No need for further explanation since that’s all it is.
CONDITIONAL STATEMENTS
Imagine having multiple options. In order to decide which option to choose, there will be a set of conditions or criteria that need to be fulfilled. For example, if the room is cold, then turn off the AC. If it’s not cold, then it should stay on. The criteria and the output are all part of conditional statements. In programming, this is commonly done with IF statements which will be shown later.
FLOWCHARTS
ALRIGHT, now we’re ready for some of the fun parts!! Flowcharts are diagrams, which in my opinion, are easier to comprehend than pseudocode. Let’s immediately jump into an example.
Flowchart Example 1
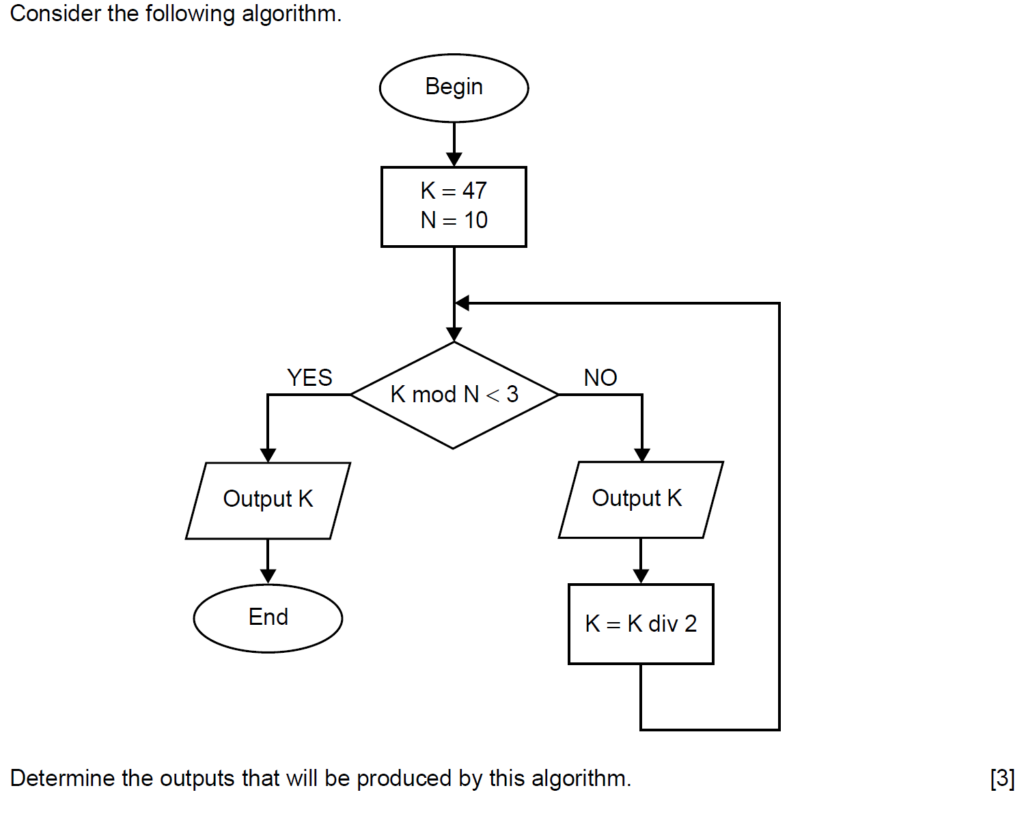
I will admit, this flowchart looks pretty complicated at first, but believe me when I say it’s not.
The first step is understanding the flow of the flowchart. Simply follow the direction of the arrows.
We see that in the beginning, there are 2 variables, ‘K’ and ‘N’ set to 47 and 10 respectively. Next, there is a conditional statement. We can tell that this is a conditional statement since there are multiple arrows coming from the diamond shaped container, and inside the container is a criteria that needs to be checked. (Note: Whenever you see the diamond shape, it’s most likely going to be a conditional statement.)
Oh I almost forgot to tell you about the terms you will often see in a flowchart: ‘mod‘ and ‘div‘.
- Mod gives the remainder of a division between 2 variables/values. For example, 5 DIV 2 is 1.
- Div gives the quotient or the exact value of the division without the remainder. For example, 5 DIV 2 is 2.
*Important fact: When you see a conditional statement that checks if the mod of 2 variables is 0, this means that the division has no remainder. For example, If A MOD B == 0; this means that the function will be executed when A divided by B leaves no remainder.
Okay, now that we know all this, let’s solve the question!!
Since the question does not involve making a table, we only have to worry about the final output. We are already provided the values of K and N so all we have to do is substitute these values into the conditional statement:
1. K mod N < 3 is the same as 47 mod 10 < 3. In this scenario, we are supposed to check if the condition is met or not. 47 mod 10 is 7, which is greater than 3, therefore the condition is NOT met, meaning NO.
2. Following the arrow, it then tells us to ‘Output K’, so we got our first output which is 47.
3. Next, the algorithm sets K = K div 2. This means that the new value of K is going to be 23.
4. Finally, the arrow loops back to the conditional statement and continues on UNTIL the condition reaches YES since that is when the algorithm ends.
Now just keep repeating the steps until you reach the “End”. Before looking at the answer below, try to do the rest of it yourself.
Answer: 47, 23, 11
If you got the answer right then great work🥳 But if not, don’t worry, we have more questions ahead for you to practice.
Flowchart Example 2
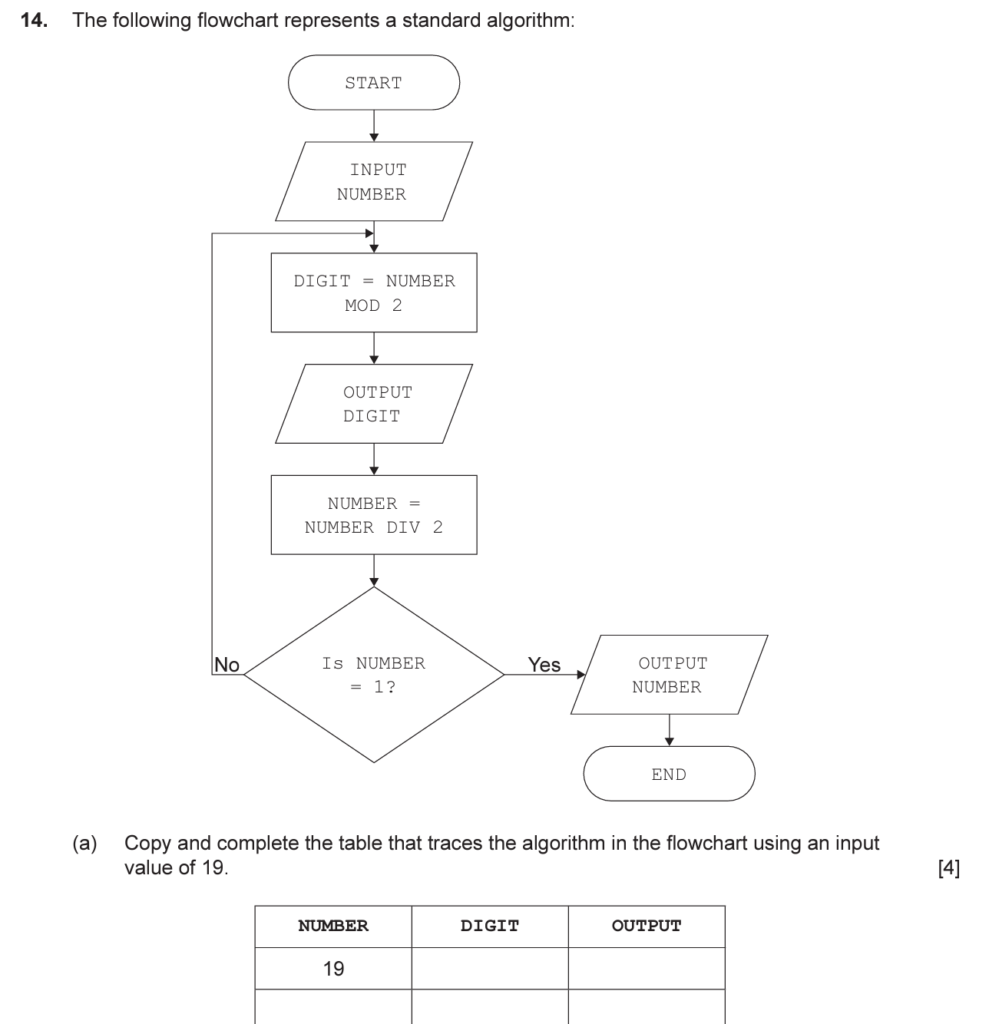
Here we have an example of another flowchart which asks us to complete a table instead of just giving the final output. Although the algorithm and question is different, the methods that we use are still the same. Give it a try before looking at the solution 🙂
Looking at the first box after ‘START‘, we are not given any variables that already have a value. However, we are given the words ‘INPUT NUMBER‘. Alright, remember to keep this in mind: Whenever you see ‘INPUT (XXX)‘, it means that we have a variable called (XXX), that (XXX) is ‘NUMBER‘ in this scenario, and it is being set by the INPUT. This means that any value is the INPUT(given by the question), will be the value of that variable. Knowing this let’s start solving:
1. Given that the INPUT is 19(as shown in the question), our NUMBER variable is 19(also shown in the table).
2. The next instruction says that DIGIT = NUMBER MOD 2. Substituting NUMBER gives us 19 MOD 2, which is 1. DIGIT is now equal to 1.
3. OUTPUT DIGIT simply means, OUTPUT 1.
4. After getting NUMBER, DIGIT, and OUTPUT, we can put those values in the table which gives us our first row!
5. Then, NUMBER = NUMBER DIV 2. What this means is that the new value of NUMBER will be set to NUMBER DIV 2, which is 19 DIV 2 => 9.
6. Checking the conditional statement, ‘Is NUMBER equal to 1?’ In this case, it is NOT 1 yet so ‘No’, then we simply loop back to where the arrow leads.
7. We should continue doing this until the value of NUMBER is 1 then finally OUTPUT that NUMBER. The result should be similar to the table below.
| NUMBER | DIGIT | OUTPUT |
| 19 | 1 | 1 |
| 9 | 1 | 1 |
| 4 | 0 | 0 |
| 2 | 0 | 0 |
| 1 | 1 |
Phew, that was a lot. But it’s about to get even more exciting because we are about to enter the world of pseudocode. Get a bottle of water and some paper because this might be a long explanation.
PSEUDOCODE
Don’t be scared, the concept of pseudocode is basically the same as flowcharts. There is actually no right or wrong way of writing pseudocode, as long as it makes sense given the context, it will be alright. The only difference between flowcharts and pseudocode is the way we represent the instructions and there are a few special algorithms that you should remember as well. Oh and don’t forget Object Oriented Programming(OOP)! That one might be a little complex for now, so let’s start from some of the important syntax(like grammar and words) we need to remember.
Variables
You guys remember variables right? How do we write it in pseudocode? It’s simple. All you have to write is: variable_name = value_of_the_variable. For example, number = 0.
Arrays
Arrays are just data storages which can store multiple data so the way it is represented is similar to a variable, only that it uses new Array(). For example, list_of_cars = new Array(“car1”, “car2”, “car3”).
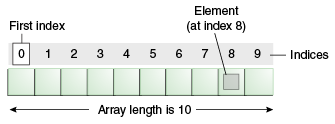
Now let’s say you want to access “car1″ from the list_of_cars array. You will need to first get the index of that element. Imagine that each element comes with a number which represents its position in the array. This number is the index of each element. It is important to note that these indices start from 0.
For example, in order to access “car1” I just need to write list_of_cars[0]. Now let’s say you want to access “car3” from the array, what would you write? If your answer is list_of_cars[2] then you would be correct!! Try looking at this image below to get a clearer understanding of how indices work or take a look at this comprehensive documentation.
Conditional Statements
Conditional statements are your IF and SWITCH as previously mentioned. From my research, SWITCH will not be seen as frequently as the IF statements so I will not distract with that for now, just know that it works similar to an IF statement, the difference is that if the statement has many possible outputs, a SWITCH should be used.
An IF statement should look like this:

If you want to make an IF … THEN … ELSE, then it would look like this:

Loops
To recap, loops are used to repeat a certain set of instructions until a certain condition is met, telling the loop to stop. The classic loops that you will see are FOR and WHILE loops.
Here’s how you write a FOR loop(N, x, and y are all placeholders):

From the for loop above, x and y are integers where x is the beginning of the loop and what N will be at the start; y is the end of the loop and what N will be at the end. N is a variable that will increment (add itself) everytime a single iteration is completed. For example,

What would the final output be? It would be:
Hello
Hello
Hello
Hello
Hello
Hello
Hello
Hello
Hello
Hello
The reason why there are 10 “Hello” instead of 9, is because the loop starts from 0, not 1.
The second type of loop is the WHILE loop. Unlike FOR loops, WHILE loops are commonly used when there is a condition that needs to be met and not a set number of loops. Here’s how to write it:

Without further a do, let’s jump into some examples to better understand pseudocode!!
Pseudocode Example 1
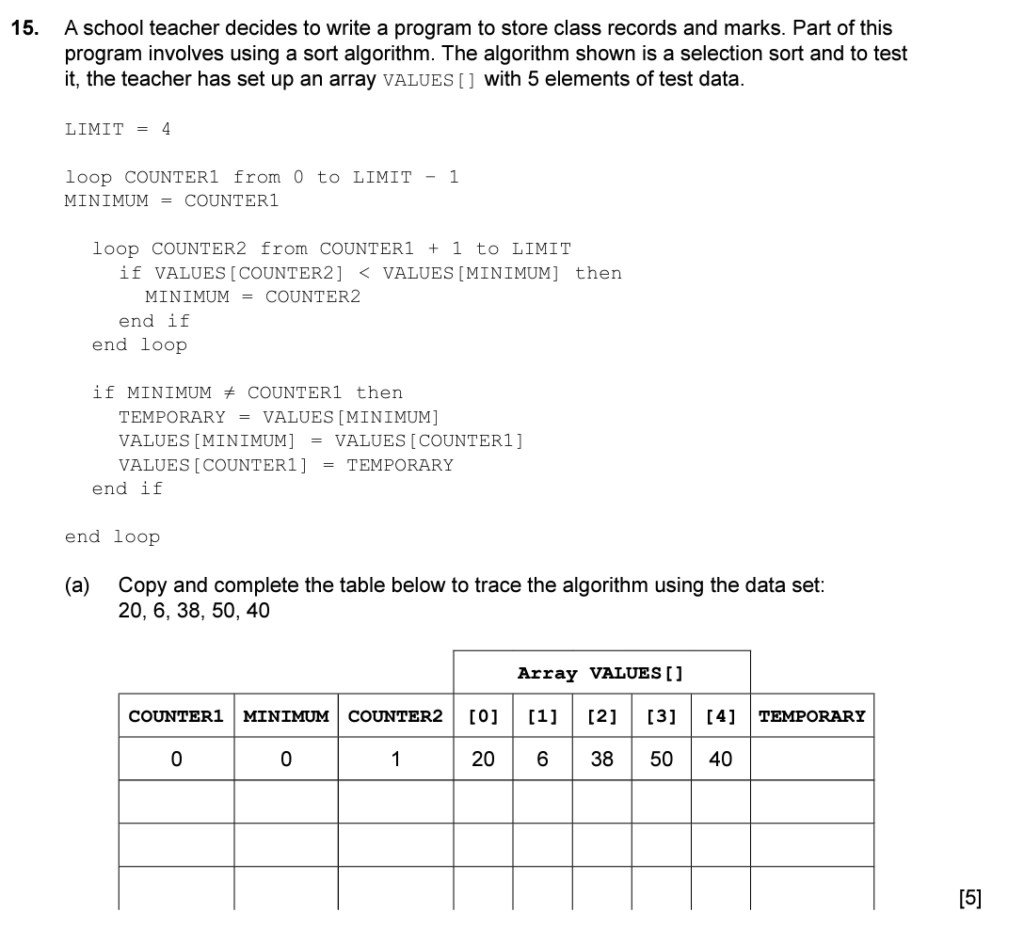
Read the question carefully and determine what it wants us to do. Similar to the flowchart question, our job here is to complete the table. While it may look like some complicated pseudocode, in reality it’s actually quite simple. It’s made up of arrays, conditional statements, and loops, all of which we have learned. In pseudocode, watch out for the indents in each line since those determine the order of each instruction.
When it comes to these types of questions, first determine your variables:
- LIMIT
- MINIMUM
- TEMPORARY
Then, figure out the loop variables:
- COUNTER1
- COUNTER2
These are important since they are the values that will be changing throughout the pseudocode algorithm.
Our main focus in this question is the array. It even gives us a clue on what this algorithm is for: ‘selection sort’. What is that??
— Intermission —
As the name suggests, a sorting algorithm is an algorithm used to rearrange the order of elements within an array or list. In our Computer Science IB syllabus, there are 2 main sorting algorithms: Selection Sort and Bubble Sort. Each of them have their own benefits and disadvantages(which you can read from your book).
SELECTION SORT
A selection sort will basically find the smallest element or element in the array and swap it with the first element. Then, it will look through every element, excluding that first element, to find the second smallest value which will then swap places with the current second element in the array. This will keep repeating until the entire array is sorted.
BUBBLE SORT
A bubble sort on the other hand will look at adjacent elements and compare which is greater or smaller. For example, the order is 1, 3, 2. The algorithm here will check if 1 is greater than or less than 3. Since 1 is already smaller than 3, it just stays. 3 will then compare itself with 2, and since 2 is smaller than 3, their positions will switch. This will keep repeating until the whole array is sorted.
— Intermission Over —
Alright, now that we know what a selection sort is, we can continue solving the question since we can kind of see what the final outcome should be. Let’s solve this question:
1. The algorithm starts with a FOR loop from 0 to LIMIT – 1 with the variable COUNTER1. LIMIT – 1 is going to be 3 since we know that LIMIT is equal to 4 initially. This means that the first FOR loop will repeat 4 times. (Remember: the loop starts from 0 not 1) MINIMUM will then be set to COUNTER1. Right now, COUNTER1 is 0, so MINIMUM will be 0.
2. We then see another FOR loop inside the first FOR loop, this time with the variable COUNTER2. This loop will go from COUNTER1+1 to LIMIT. Substituting the variables with integers, we know that the loop will go from 1 to 4, which will also repeat 4 times(since this time it starts from 1). This means that COUNTER2 will be 1 at the start.
3. Now we reach our first IF statement inside of the FOR loop which is:

The first thing that we need to do is look at the condition. It is trying to check whether VALUES[COUNTER2] is smaller than VALUES[MINIMUM] or not. By substituting COUNTER2 and MINIMUM, we get that VALUES[COUNTER2] is simply VALUES[1] and VALUES[MINIMUM] is VALUES[0]. By looking at the table provided, we know that VALUES[1] is 6 and VALUES[0] is 20. 6 is less than 20, so, we need to do the action which is MINIMUM = COUNTER2. This means that MINIMUM is now set to 1.
4. But that’s not the end since the FOR loop will repeat itself. This time however, COUNTER2 is 2 since it is incremented. Then we repeat the same steps of substituting the values into the IF statement. VALUES[2] < VALUES[1] is (38 < 6), which is FALSE. This means that nothing will happen. Looping again increments COUNTER2 to 3. VALUES[3] < VALUES[1] is FALSE. Lastly, VALUES[4] < VALUES[1] is also FALSE.
5. After the inner loop is completed, notice that there is another IF statement with the same indentation. This means that before going to the big loop, we need to look at this IF statement as well. It says that:

Just like the previous IF statement, all we have to do is substitute the values in. The condition checks if MINIMUM not equal to COUNTER1; MINIMUM is 1 which is NOT equal to COUNTER1 which is 0, we set TEMPORARY = VALUES[MINIMUM]. First, TEMPORARY is set to 6. Then VALUES[MINIMUM] will be set to 20(swapping their positions). Finally, VALUES[COUNTER1] is set to 6. REMEMBER: Not all the spaces will and need be filled in the table. In fact, you could be deducted points for filling in the wrong boxes.
If you have been following up until this point, your table should look like this:

5. Now that we have reached the final end if, we will loop through the big loop so COUNTER1 becomes 1. Then, we basically repeat steps 1 to 4 all over again with different values. Following all the steps should give you a table that looks like this:
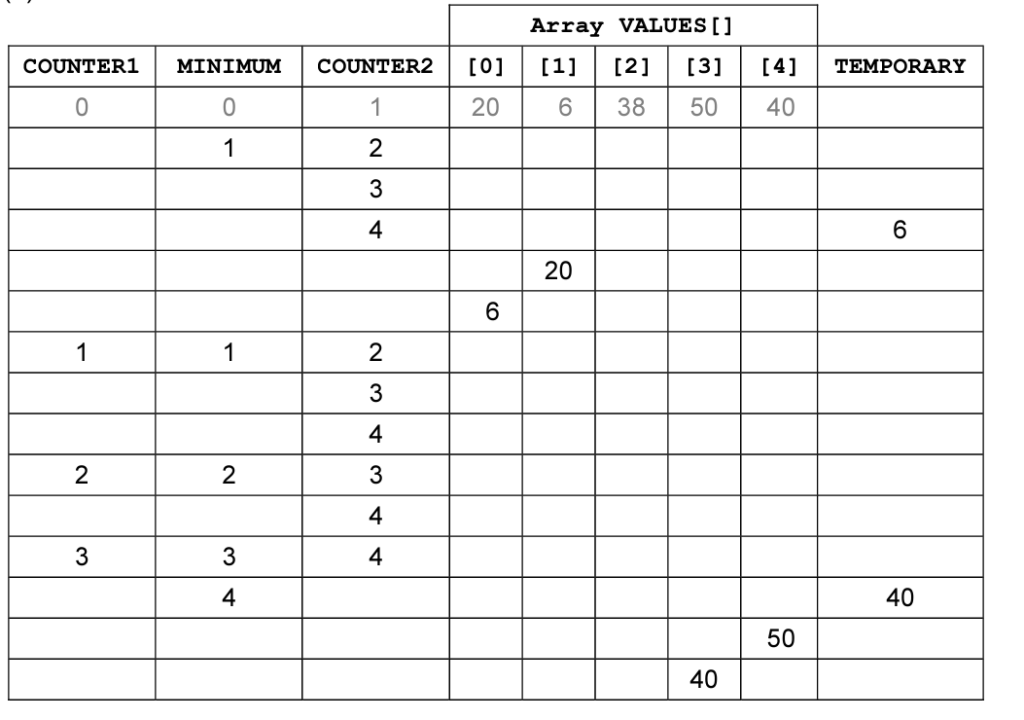
From the table above, we can see the effects of this selection sort worked since the integers in the array are all aligned in ascending order: 6, 20, 38, 40, 50. 😲
TO BE CONTINUED… (Read some information about maths here for the meantime)


